Scenario 3 — RevPi with an isolated Octave network on ETH1#
Level: intermediate · Devices: RevPi
When this applies#
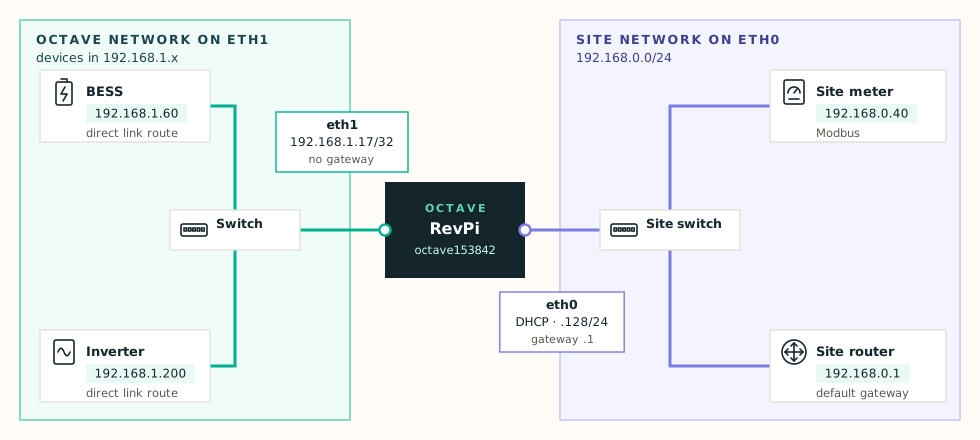
- A RevPi controls Octave-supplied equipment — BESS, EMS, inverter — on its own switch or cable on
eth1. - The site network is on
eth0, set up as in Scenario 1 or Scenario 2.
Why a separate network?#
The Octave network carries battery and inverter control traffic. Keeping it on its own port means:
- site devices can't reach our equipment, and our equipment can't disturb the site;
- our equipment keeps the same addresses on every site, whatever the site uses;
- a misconfiguration or broadcast storm on the site can't take down battery control.
The RevPi is the only link between the two networks, and it doesn't forward traffic between them.
How eth1 works: one address, one route per device#
eth1 is deliberately simple and strict:
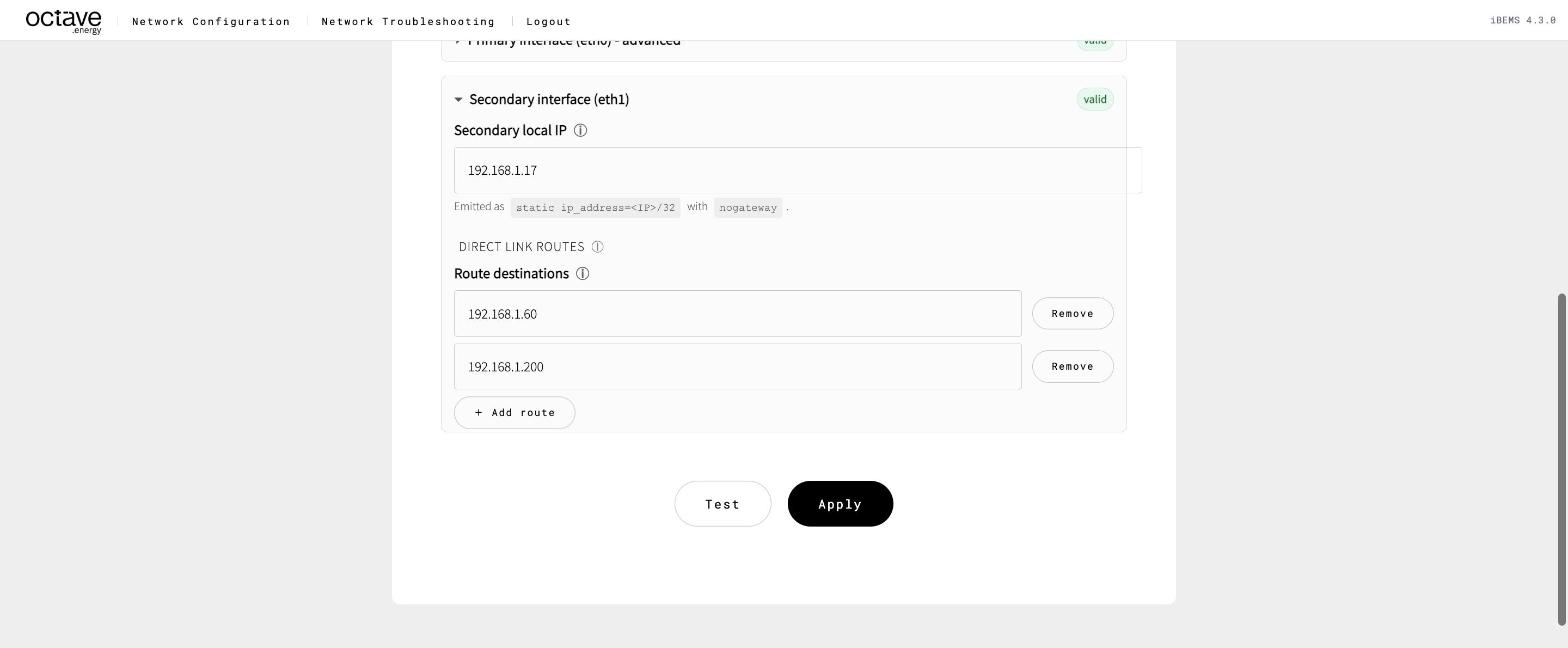
- It has one address, the Secondary local IP —
192.168.1.17by default. It's always configured as a/32with no gateway. - A
/32covers only the RevPi's own address. The RevPi therefore knows nothing about the rest of192.168.1.xuntil you tell it. - You tell it with Direct link routes: one row per Octave device, such as
192.168.1.60for the BESS and192.168.1.200for the inverter. Each becomes a/32route out ofeth1.
Info
Every Octave device on eth1 needs its own direct link route. A device without one is looked for on eth0, via the site's default gateway, and never answers. This is the number-one cause of "the new battery doesn't respond".
Why so strict? Because the Octave range often also exists on the site. With a /32 and explicit routes, the RevPi never confuses a site device with one of ours. See Scenario 6.
What the device needs#
| Field | Value (example) | Rule |
|---|---|---|
| Secondary local IP | 192.168.1.17 | Any free IPv4 address. Written without a prefix — the device adds /32. |
| Direct link routes | 192.168.1.60, 192.168.1.200 | One host per row. Must share the first three numbers with the secondary IP — 192.168.1.x here. |
Configure#
- Open Edit configuration → Secondary interface (eth1).
- Check Secondary local IP. Keep the default
192.168.1.17unless an Octave device already uses that address. - Under Direct link routes, add one row per Octave device with + Add route.
- Press Test, then Apply.
Note
Changing only eth1 doesn't touch eth0, so the page stays reachable. That makes it the safest change on the page.
Check it#
- Current network configuration → Secondary interface (eth1) lists the IP, the routes and a live
/32address. - Troubleshooting → Network Overview: each Octave device has a route with gateway = the secondary IP on
eth1. The onlydefaultroute is oneth0. - Route Test for each Octave device → Interface
eth1, Source192.168.1.17. - Connectivity with Interface for ARPing = eth1, then Port / Service Scan (Modbus) for each device.
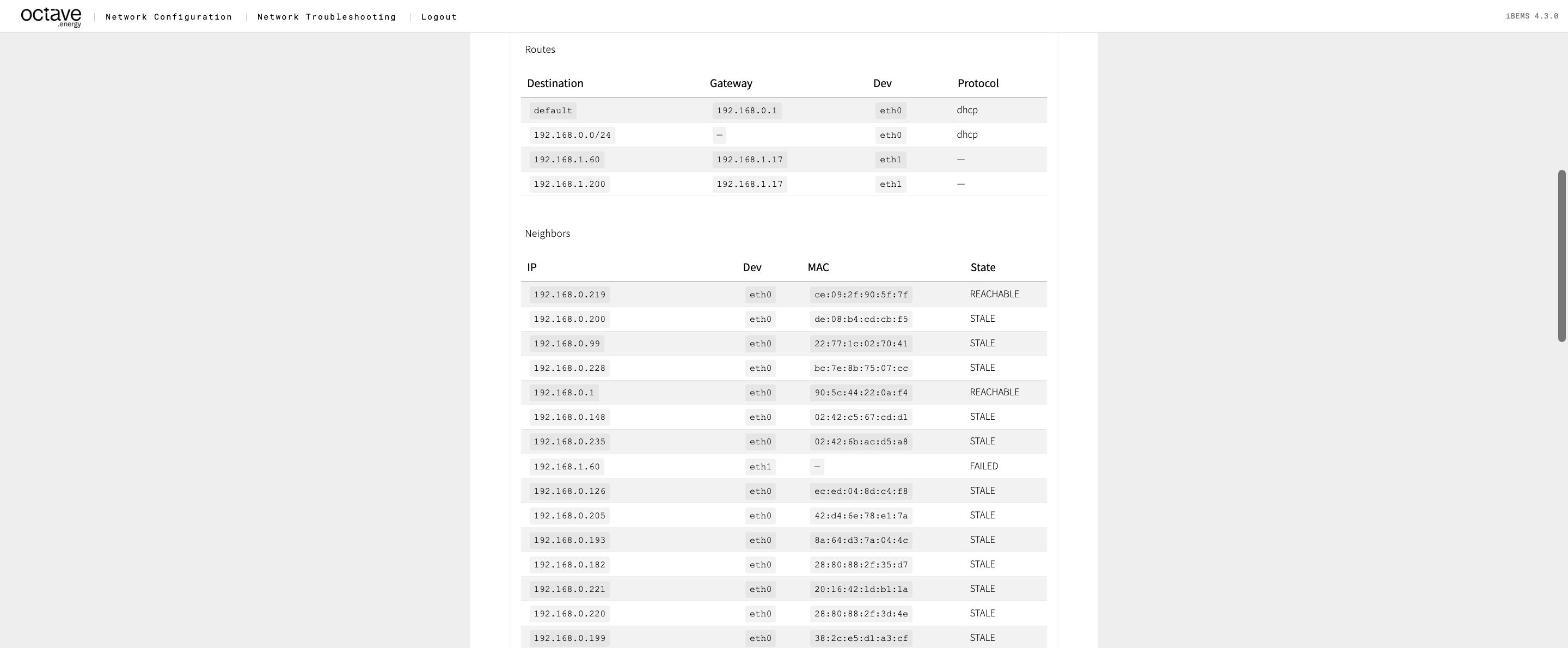
Network Overview: eth1 /32 and direct link routes
Watch out for#
- Route missing for a new device. Route Test shows
eth0instead ofeth1→ add the route. See Traffic leaves on the wrong interface. - Device Discovery doesn't search
eth1as a whole. Only devices with a direct link route are sent out ofeth1. To find an Octave device whose address you don't know, use Connectivity with ARPing oneth1against the expected address, or read it on the device's own display. - Octave device in another range. All direct link routes must share the first three numbers of the secondary IP. A device at
192.168.2.50needs either re-addressing, or a secondary IP in192.168.2.x. - Swapped cables. Use Ethernet Link on the Troubleshooting page and check which port has link.