Onboarding process#
This page describes the onboarding process for integrating with the Octave Partner API.
1. Credentials setup#
Our API is protected by several authentication mechanisms. One of them is mTLS, on both the HTTP and MQTT API. This means that your requests must include a valid client certificate for authentication.
These are the steps in the process to set this up:
- You create a self-signed Certificate Authority (later abbreviated in these docs as
CA) - You create a client certificate, signed by your CA. A separate one for the HTTP API and for the MQTT API is required.
- You communicate the public parts of the CA and client certificates to Octave, and Octave configures their API to trust these credentials.
- After Octave has configured their API to trust your certificates, you use the private keys of the client certificates to sign requests against the Octave API.
You will need to do the certificate generation twice: once for our integration environment and once for our production environment. It is preferred to have this environment reflected in the certificate subjects. In the examples below I've added 'Integration' to the Common Name (CN) as an example. Having the environment explicitly stated there will reduce confusion in the future when managing multiple environments and troubleshooting issues.
Certificate setup script
We have provided some scripts to generate the required certificates in the steps above. You can find them in the zip-file here: certificate_script.zip. Download and extract this, and then go to that location in your terminal.
Create a self-signed Certificate Authority (CA)#
The argument provided is the subject field of the CA. Replace this information with your own details.
./create_self_signed_ca.sh '/C=MyCountry/ST=MyStateOrProvince/L=MyLocality/O=MyCompany/OU=MyDepartment/CN=MyCompany CA'
# Example invocation:
# ./create_self_signed_ca.sh '/C=BE/ST=East Flanders/L=Ghent/O=Octave/OU=Engineering/CN=Octave Integration CA'
This will produce the following two files:
private/CA.keypublic/CA.pem
Create HTTP client certificates#
Re-use most of the fields from the CA subject, but make sure to change the CN to say that this is the HTTP client certificate.
./create_client_cert.sh http '/C=.../ST=.../L=.../O=.../OU=.../CN=...'
# Example invocation:
# ./create_client_cert.sh http '/C=BE/ST=East Flanders/L=Ghent/O=Octave/OU=Engineering/CN=Octave Integration HTTP Client'
This will produce the following two files:
private/http_client.keypublic/http_client.pem
Create MQTT API client certificates#
Re-use most of the fields from the CA subject, but make sure to change the CN to say that this is the MQTT API client certificate.
./create_client_cert.sh rt '/C=.../ST=.../L=.../O=.../OU=.../CN=...'
# Example invocation:
# ./create_client_cert.sh rt '/C=BE/ST=East Flanders/L=Ghent/O=Octave/OU=Engineering/CN=Octave Integration MQTT API Client'
This will produce the following two files:
private/rt_client.keypublic/rt_client.pem
Communicate the public certificates to Octave#
Send us the files below. Note that these are only the public parts.
public/http_client.pempublic/rt_client.pempublic/CA.pem
The scripts above will generate all the necessary files in a public folder, so you can just zip this folder as it contains everything we need.
Take note of the end of the validity period of the certificates and make sure to schedule a renewal on time.
Save this information#
Make sure to securely store this information on your end.
You will need the private keys of the certificates in order to perform requests to the API.
You will need the private keys of the CA in order to generate new client certificates and/or renew existing ones when they expire. It is thus important that you keep this information! When the client certificates expire (in one year), you will need to generate new ones using this same CA private key.
Keep private keys safe on your end
Make sure that your private keys are never shared or exposed publicly. We need to know only the public part of these certificates. The private keys should not be shared with us or anybody else, and should remain securely stored on your end.
Once we have received these certificates, we will be able to configure your access to the API, and configure some additional things required for your integration depending on what you want to use:
Receive additional credentials#
Each API has some additional authentication information that we will provide to you once your certificates are received and validated.
HTTP API#
We will create an api key for you that you will need to include under the header X-API-Key in all of your requests.
MQTT API#
To connect over MQTT to the API, you need to provide a client id as identifier. We will communicate which format/identifiers you can use.
2. Access to simulator site in our integration environment#
We will setup a simulated site in our integration environment for you to test your integration before going live. This simulated site will have some assets and provides a limited set of features compared to a real site. It is meant for you to safely test your integration without affecting any real environment or site. You will be able to query metrics emitted by that simulated site. You can also send setpoints and commands to it like a real site.
The simulation is not a fully realistic behaviour, e.g. it will not necessarily react correctly to all setpoints and commands. However, the goal is mostly to validate that you can get the data from it, that the data formats are as expected, and that any commands you send are valid data and received successfully on our end, etc...
We will also create an account on our Portal for you where this simulated site can be accessed. This way you can also verify some of the data retrieved via the API against what is shown on the Portal.
If you go to the Portal and navigate to the simulated site, then go to the BESS tab, you will be able to see the setpoints as shown in the image below. The black line shows the setpoints that are requested. The green line shows the actual battery behaviour; depending on SoC, site limits etc., the actual behaviour may differ from the requested setpoints.
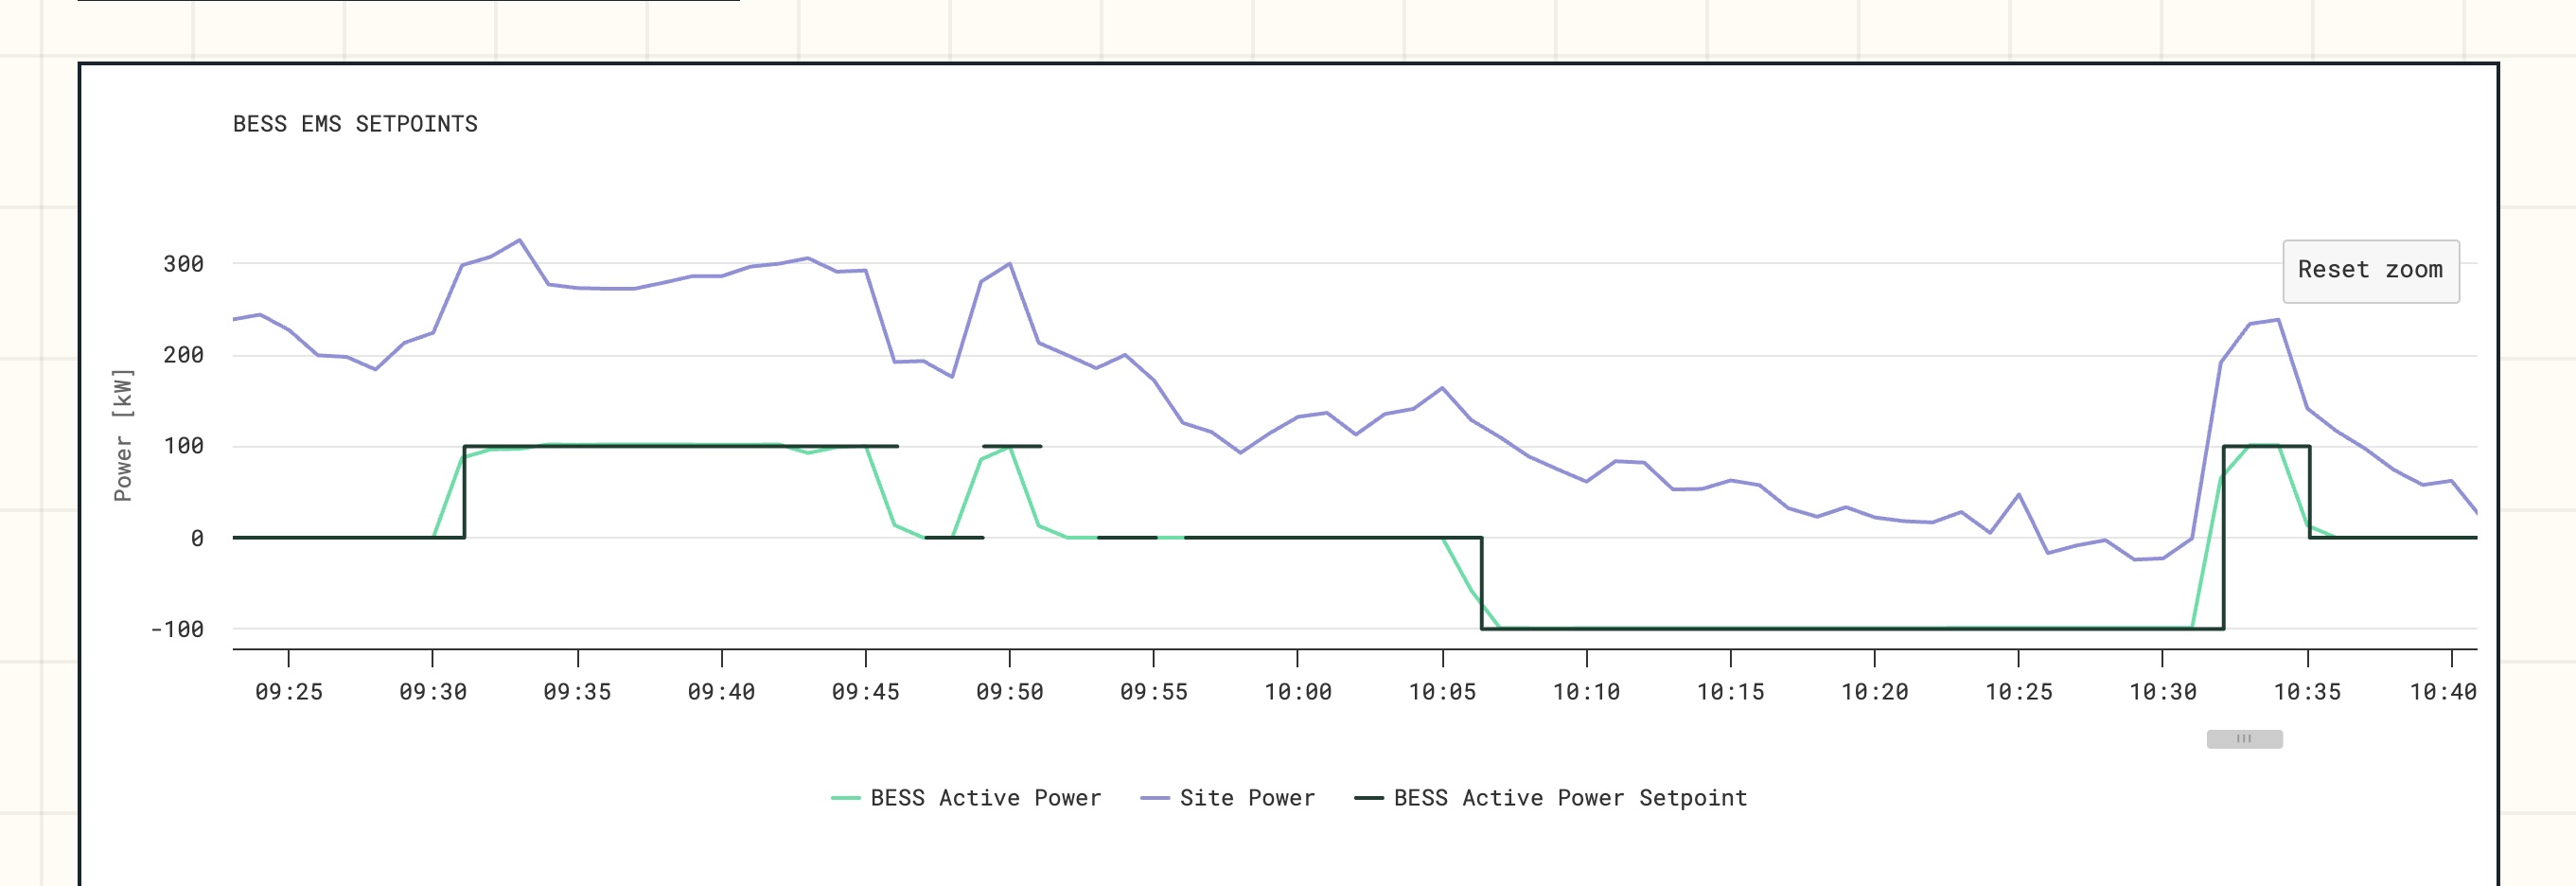
Setpoints visualized in the portal.
This simulator environment stays active also after you have completed the integration testing phase and move on to the production environment. You can continue to use it for further testing and validation as needed.
Integration environment expectations
The integration environment is intended for testing purposes and may not always reflect the exact behavior of the production environment. It is the environment where you can safely test your integration without affecting any real environment or site. It is also for us an environment where we can test and validate changes before they are deployed to the production environment. We do not monitor api traffic on this environment as closely as the production environment, so issues may arise without immediate notice.
3. Access to production environment#
After both sides have validated that the integration using the simulator is functional, we continue the setup to provide you access to the production environment.
We will need a set of production certificates from you, if you hadn't already provided them during the first step of the process above. You will then receive a separate api key (for HTTP) and/or client ID (for MQTT API) specifically for the production environment.